Instruction:How to create a public NFT: Difference between revisions
| [checked revision] | [checked revision] |
(Created page with "{{#seo: |title= How to create a public NFT |titlemode=append |keywords= How to create a public NFT, how to create an NFT, how to create an NFT, create an NFT, issue an NFT, cheap NFT, make your NFT, make your NFT, create your NFT, create an NFT, create an NFT, make an NFT, make an NFT |description= Decimal instruction. How to create a public NFT on DecimalChain }} <div class="mikio-article-content"> <div class="mikio-tags"> </div> <span id="How to create a public NFT"><...") |
CryptoUser (talk | contribs) No edit summary |
||
| Line 1: | Line 1: | ||
{{#seo: | {{#seo: | ||
|title= How to create a public | |title= How to create a public NFT — Instruction on Decimal Wiki | ||
|titlemode=append | |titlemode=append | ||
|keywords= How to create a public NFT, how to create an NFT, how to create an NFT, create an NFT, issue an NFT, cheap NFT, make your NFT, make your NFT, create your NFT, create an NFT, create an NFT, make an NFT, make an NFT | |keywords= How to create a public NFT, how to create an NFT, how to create an NFT, create an NFT, issue an NFT, cheap NFT, make your NFT, make your NFT, create your NFT, create an NFT, create an NFT, make an NFT, make an NFT | ||
|description= Decimal instruction. How to create a public NFT on DecimalChain | |description= Decimal instruction. How to create a public NFT on DecimalChain | ||
}} | }} | ||
{{manual-console}} | |||
{{main article|NFT}} | |||
=== Step 1 of 2: Token Information === | |||
= | |||
''' | Go to '''[[Decimal Console]]''', in the '''NFT''' section, available at https://console.decimalchain.com/nft, and click on '''Create NFT''': | ||
[[File:How_to_create_a_public_NFT_1.png|700px|thumb|left]]<br clear="all"> | |||
Fill in the fields:</br> | |||
[[File:How_to_create_a_public_NFT_2.png|700px|thumb|left]]<br clear="all"> | |||
# '''Collection name.''' Specify only Latin alphabet characters. Spaces and other characters are not allowed. Displayed on the blockchain. | |||
# '''NFT Name.''' Enter the name of your NFT token. Displayed in the Console. | |||
# '''Reserve''' Choose the coin you are putting in reserve for the NFT. | |||
# '''Reserve amount.''' Specify the number of coins being put in reserve for the NFT. | |||
# '''Description.''' Enter the description of your NFT token. | |||
# '''Quantity.''' Specify the number of NFT tokens to be created. | |||
Click '''Next (7)'''. | |||
[[File: | |||
=== Step 2 of 2: Blockchain information === | |||
[[File:How_to_create_a_public_NFT_3.png|700px|thumb|left]]<br clear="all"> | |||
Token '''URI (1)''' and '''URI identifier (2)''' are filled in automatically and are primarily intended for experienced users who wish to integrate the '''NFT''' token into their script [[algorithm]]s. | |||
Upload the '''NFT file (3)'''. | |||
: Allowed file formats: '''png, jpeg, gif, mp3, mp4, ai, psd, pdf'''. | |||
: Allowed file size: up to 100 MB. | |||
Click '''Next | Click '''Next'''. | ||
Select the options: | |||
[[File: | [[File:How_to_create_a_public_NFT_4.png|700px|thumb|left]]<br clear="all"> | ||
: 1. '''Add new tokens to the collection.''' If the option is activated, you will be able to add new tokens to the {{l|https://decimalchain.com/docs/nft/nft-collection/|collection}}. | |||
: 2. '''Private token.''' If the option is deactivated, you will create a public NFT. | |||
Click '''Create NFT (3)''': | |||
[[File:How_to_create_a_public_NFT_5.png|700px|thumb|left]]<br clear="all"> | |||
Review the details of the NFT being created, along with the creation '''fee (1),''' and click '''Confirm (2)'''. | |||
Check the transaction details and click '''Confirm (1)''': | |||
[[File:How_to_create_a_public_NFT_6.png|700px|thumb|left]]<br clear="all"> | |||
After a successful transaction, you will see a corresponding notification and a link to the '''Transaction Hash (1)''', which contains all the information about the NFT creation transaction on the Decimal blockchain. | |||
Click ''' | Click '''OK (2)''': | ||
[[File:How_to_create_a_public_NFT_7.png|700px|thumb|left]]<br clear="all"> | |||
[[File: | |||
The created NFTs are displayed in the '''NFT''' section under the '''My NFT''' tab and are available for sending within the Decimal blockchain: | |||
[[File: | [[File:How_to_create_a_public_NFT_8.png|700px|thumb|left]]<br clear="all"> | ||
{{interwiki|ru=Инструкция:Как создать публичный NFT}} | |||
[[Category: | [[Category:NFT on DecimalChain]] | ||
Revision as of 18:27, 10 April 2024
| This is a page with the instruction guide to the Decimal Console. |
Main article: NFT
Step 1 of 2: Token Information
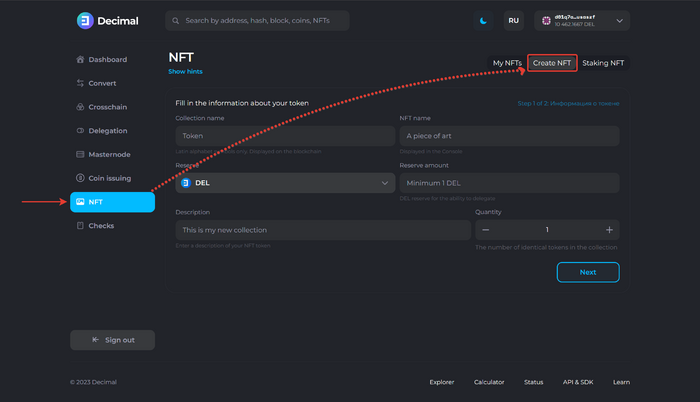
Go to Decimal Console, in the NFT section, available at https://console.decimalchain.com/nft, and click on Create NFT:
Fill in the fields:
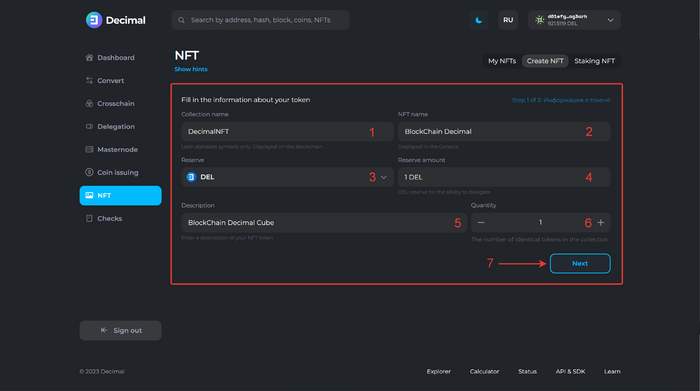
- Collection name. Specify only Latin alphabet characters. Spaces and other characters are not allowed. Displayed on the blockchain.
- NFT Name. Enter the name of your NFT token. Displayed in the Console.
- Reserve Choose the coin you are putting in reserve for the NFT.
- Reserve amount. Specify the number of coins being put in reserve for the NFT.
- Description. Enter the description of your NFT token.
- Quantity. Specify the number of NFT tokens to be created.
Click Next (7).
Step 2 of 2: Blockchain information
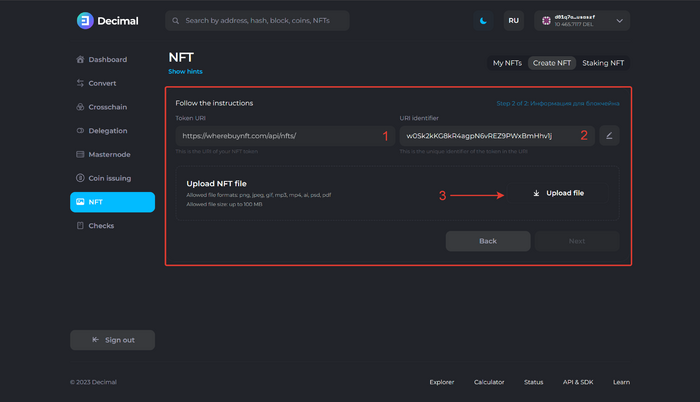
Token URI (1) and URI identifier (2) are filled in automatically and are primarily intended for experienced users who wish to integrate the NFT token into their script algorithms.
Upload the NFT file (3).
- Allowed file formats: png, jpeg, gif, mp3, mp4, ai, psd, pdf.
- Allowed file size: up to 100 MB.
Click Next.
Select the options:
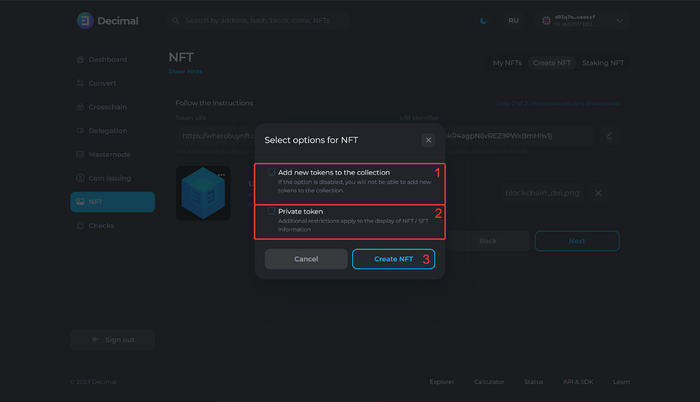
- 1. Add new tokens to the collection. If the option is activated, you will be able to add new tokens to the collection.
- 2. Private token. If the option is deactivated, you will create a public NFT.
Click Create NFT (3):
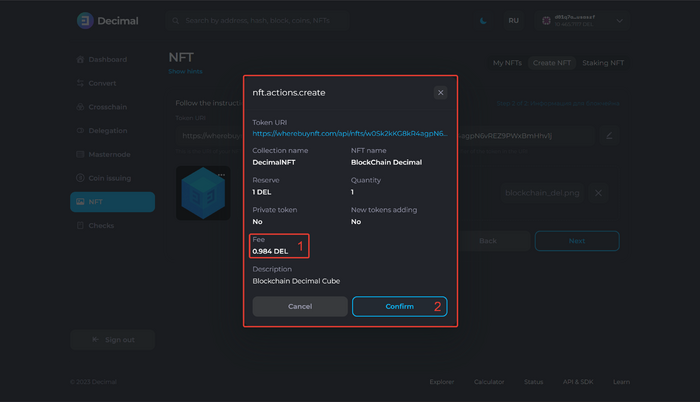
Review the details of the NFT being created, along with the creation fee (1), and click Confirm (2).
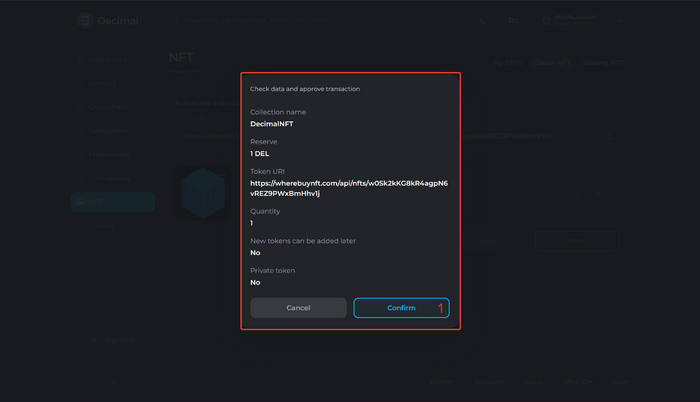
Check the transaction details and click Confirm (1):
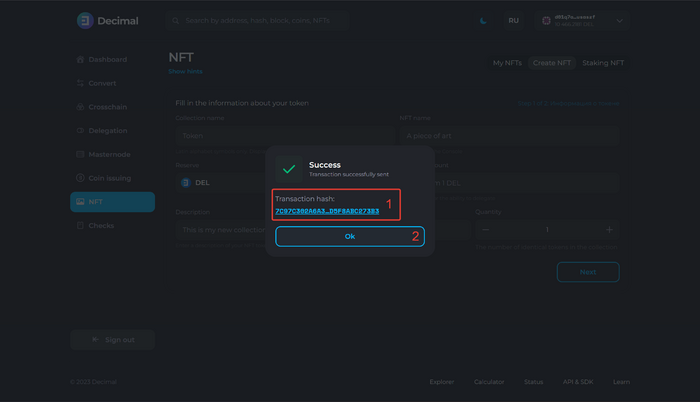
After a successful transaction, you will see a corresponding notification and a link to the Transaction Hash (1), which contains all the information about the NFT creation transaction on the Decimal blockchain.
Click OK (2):
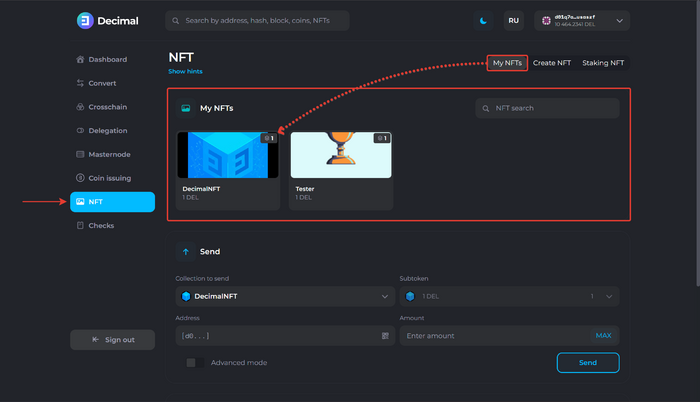
The created NFTs are displayed in the NFT section under the My NFT tab and are available for sending within the Decimal blockchain:
