Instruction:How to send DEL: Difference between revisions
| [unchecked revision] | [unchecked revision] |
(Created page with "<div class="mikio-article-content"> <div class="mikio-tags"> </div> <span id="kak_otpravit_del"></span> = Как отправить DEL = <div class="level1"> Для первого и последующих переводов вам потребуется: <ol> <li><div class="li"> войти в свою персональную консоль (кошелёк) с помощью seed-фразы; </div></li> <li><div class="li"> ввести адрес, на ко...") |
No edit summary |
||
| Line 1: | Line 1: | ||
{{#seo: | {{#seo: | ||
|title=How to | |title= How to set an avatar for a coin or validator | ||
|titlemode=append | |titlemode= append | ||
|keywords=How to | |keywords= How to set an avatar for a coin or validator | ||
|description=How to | |description= How to set an avatar for a coin or validator | ||
}} | }} | ||
How to | How to set an avatar for a coin or validator | ||
Avatars for coins and masternodes are installed using a third-party resource — gravatar.com . | |||
Before you start uploading an image to the DecimalChain console, register on Gravatar and link the required image to the mail. | |||
Registration on Gravatar | |||
Step 1: Go to the website: https://ru.gravatar.com / and click “Enter”. | |||
Step 2: You will be taken to the authorization page, which takes place through a WordPress account. If you don't have one, then create one as shown below. | |||
Next, you will be taken to the account registration form, where you need to enter your email, or log in using Google (Continue with Google). | |||
RECOMMENDATION: you need to register and access the site from the Google form. Prepare your mail in advance gmail.com , in case you don't have it. | |||
After registering via Google Mail, you will be taken to a WordPress page where you will be asked to choose the name of your site. Log out of this page to the website https://ru.gravatar.com . | |||
Step 3: Log in using the Google form. | |||
Step 4: Click the Add a new image button to select your avatar. | |||
Step 5: Click the Upload new button to download the avatar from your device. | |||
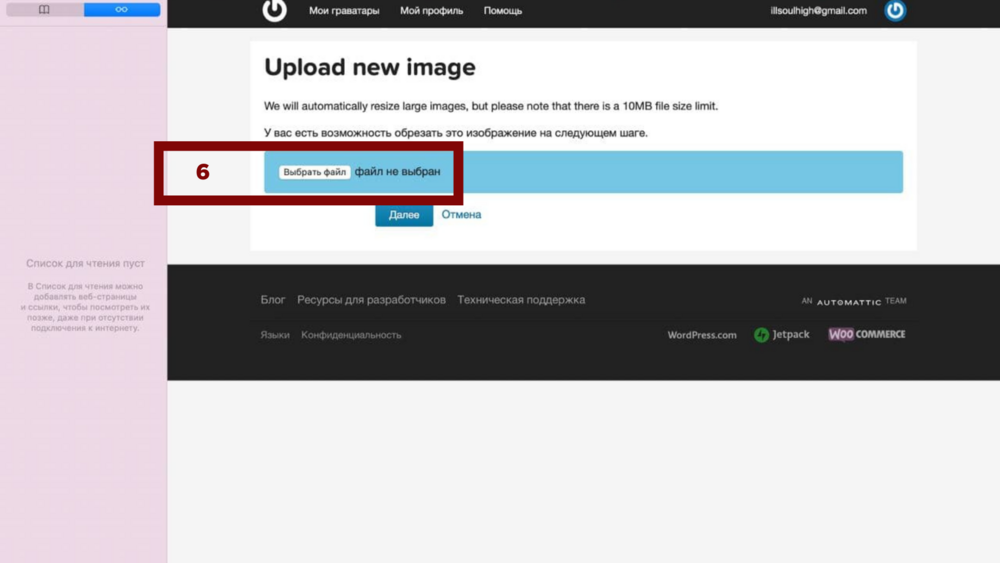
Step 6: Proceed to the file selection as shown in the screenshot. | |||
Step 7: Select the file you want to upload and click the button as shown in the screenshot. | |||
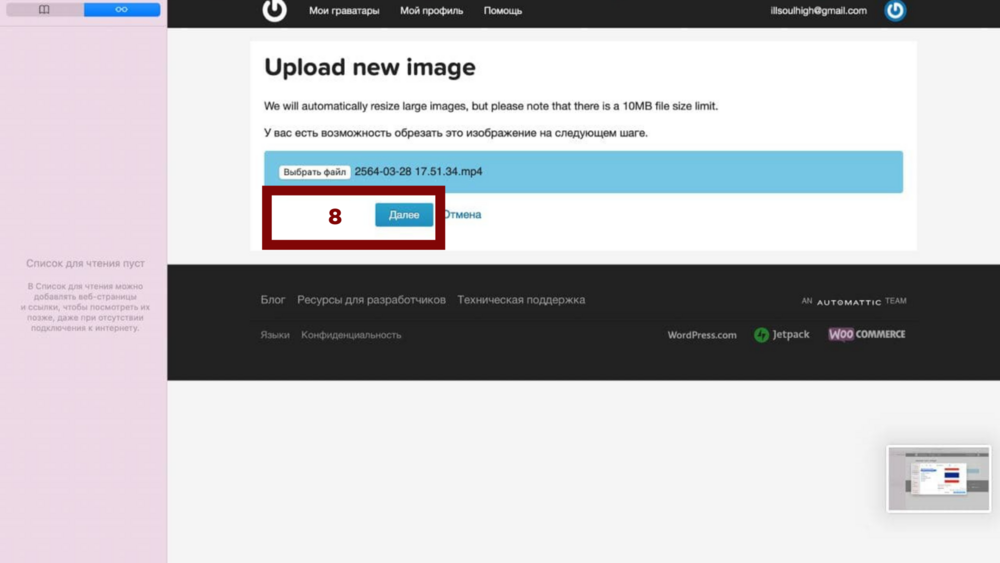
Step 8: Click “Next”. | |||
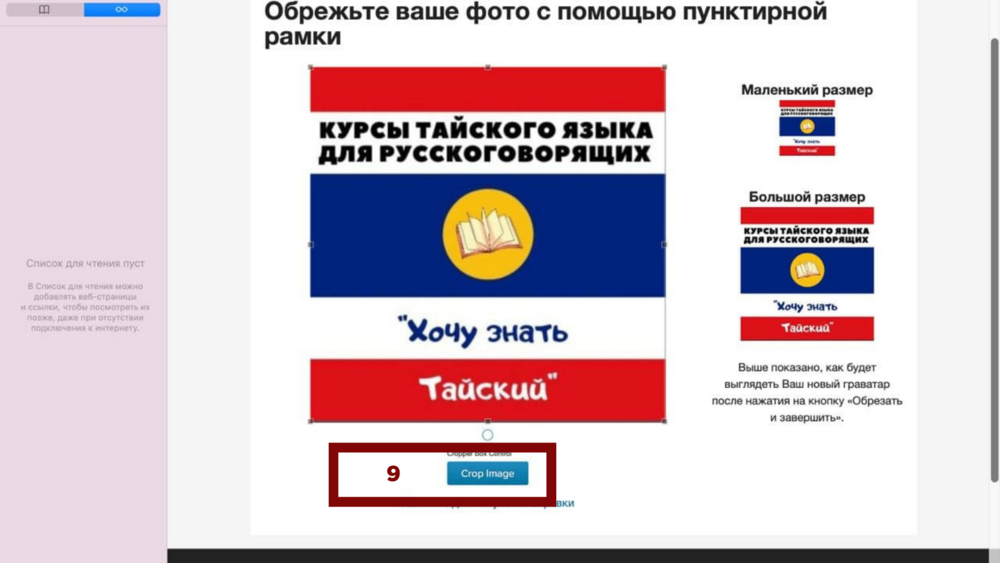
Step 9: Click the buttonCrop Image, as shown in the screenshot. | |||
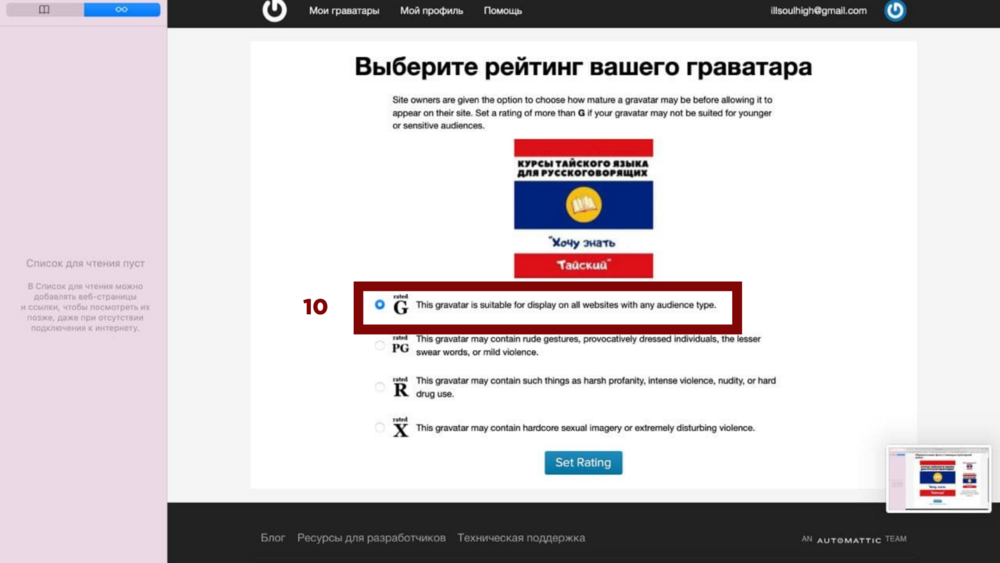
Step 10: Select “Format G” and press the Set rating button. | |||
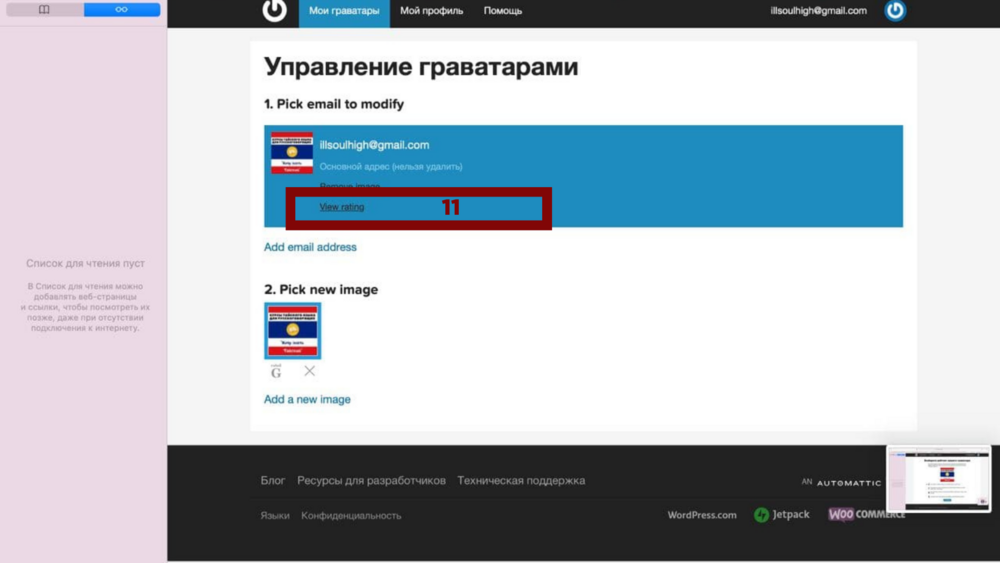
Step 11: Under the number 1 you see your current avatar, and under the number 2 you can upload different images for your avatar. | |||
Click on the labelView rating, which is highlighted in the screenshot. | |||
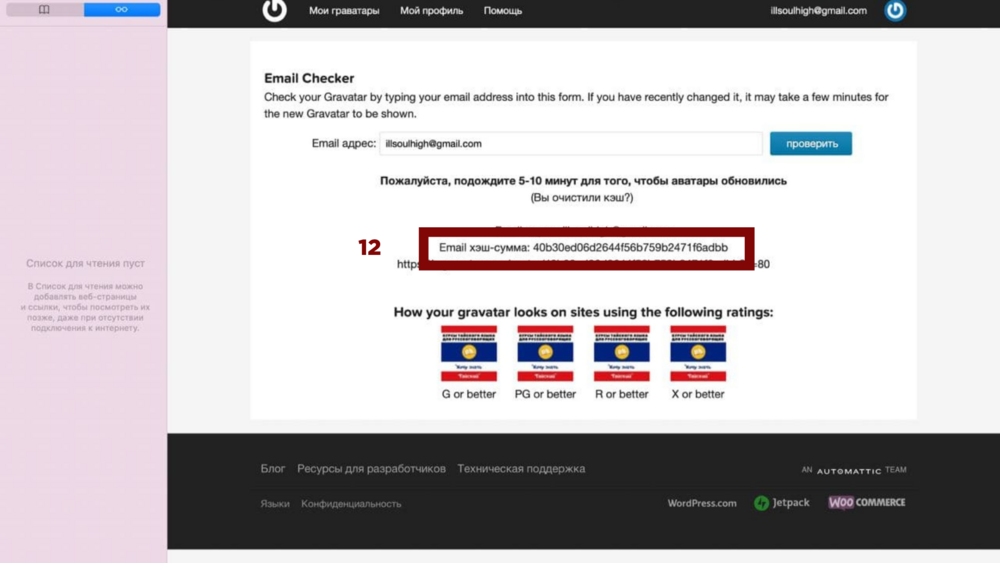
Step 12: In the screenshot you can see the hash amount to be inserted into the DecimalChain console when creating or editing a token or valaditor. | |||
Note | |||
1.Gravatar is linked to a WordPress account and allows you to have only one avatar per WordPress account. | |||
2.You can log in from one browser once. When you log out of your Gravatar account and log in again, you will be logged back into the same account. In this regard, if you want to upload multiple avatars, you will need multiple Google mail addresses. | |||
3.Avatars can be changed on the same account, but time must pass for the correct display. | |||
How to install an avatar for a coin | |||
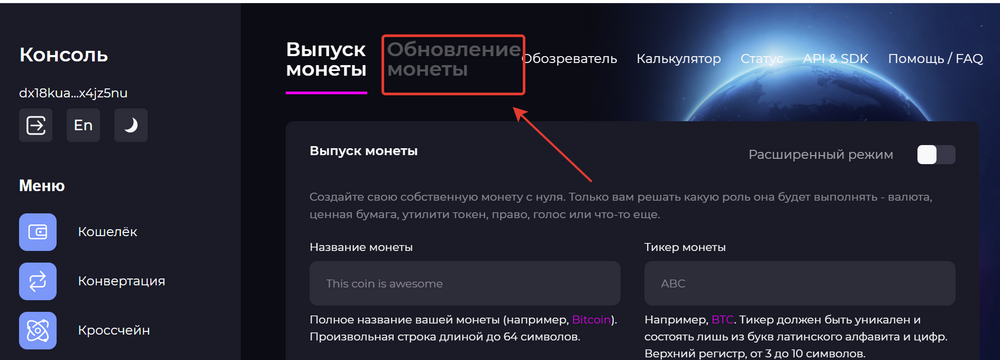
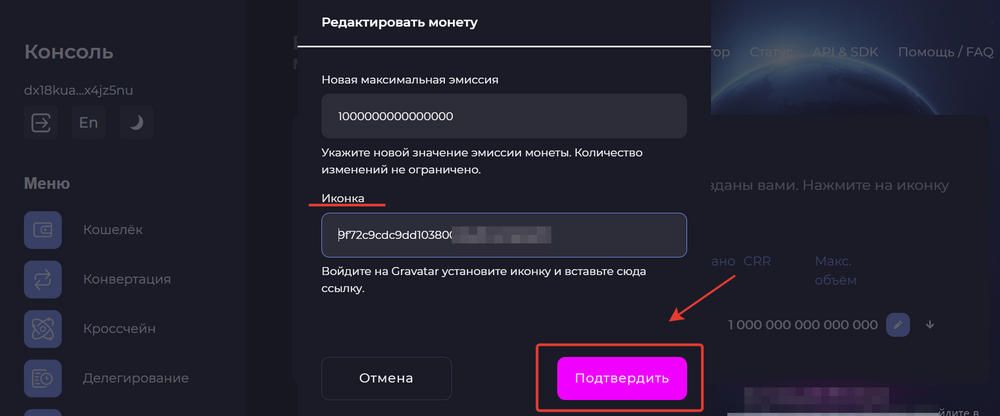
Log in to your console in the “Coin Issue” section and enter the “Coin Update” tab. | |||
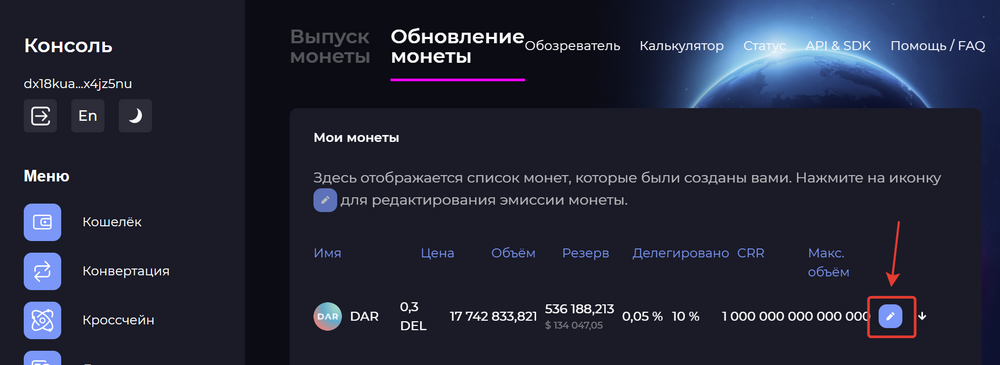
Next, click on the edit icon. | |||
Insert the hash sum from step 12 of the Gravatar instructions into the “Icon” column and click the “Confirm” button. | |||
How to install an image on a masternode | |||
To set an avatar for the validator, go to the “Masternode” tab. Scroll down to the “Edit Masternode” form and paste the hash sum from step 12 of the Gravatar instructions into the “Icon” column. | |||
[[File:Instructions-gavatar_1_2_.png|1000px|class=mediacenter]] | |||
[[File:Instructions-gavatar_2_2_.png|1000px|class=mediacenter]] | |||
[[File:Instructions-vxod_v_pochtu.png|1000px|class=mediacenter]] | |||
[[File:Instructions-gavatar_4_3_.png|1000px|class=mediacenter]] | |||
[[File:Instructions-gavatar_5_3_.png|1000px|class=mediacenter]] | |||
[[File:Instructions-gavatar_6.png|1000px|class=mediacenter]] | |||
[[File:Instructions-gavatar_7.png|1000px|class=mediacenter]] | |||
[[File:Instructions-gavatar_8.png|1000px|class=mediacenter]] | |||
[[File:Instructions-gavatar_9.png|1000px|class=mediacenter]] | |||
[[File:Instructions-gavatar_10_3_.png|1000px|class=mediacenter]] | |||
[[File:Instructions-gavatar_11_3_.png|1000px|class=mediacenter]] | |||
[[File:Instructions-gavatar_12_5_.png|1000px|class=mediacenter]] | |||
[[File:Instructions-2021-04-09_14-31-01.png|1000px|class=mediacenter]] | |||
[[File:Instructions-2021-04-09_15-31-04.png|1000px|class=mediacenter]] | |||
[[File:Instructions-2021-04-09_15-33-40.png|1000px|class=mediacenter]] | |||
[[File:Instructions-2021-04-09_15-41-36.png|1000px|class=mediacenter]] | |||
[[Category::Instructions]] | |||
Revision as of 03:24, 5 May 2022
How to set an avatar for a coin or validator
Avatars for coins and masternodes are installed using a third-party resource — gravatar.com .
Before you start uploading an image to the DecimalChain console, register on Gravatar and link the required image to the mail.
Registration on Gravatar
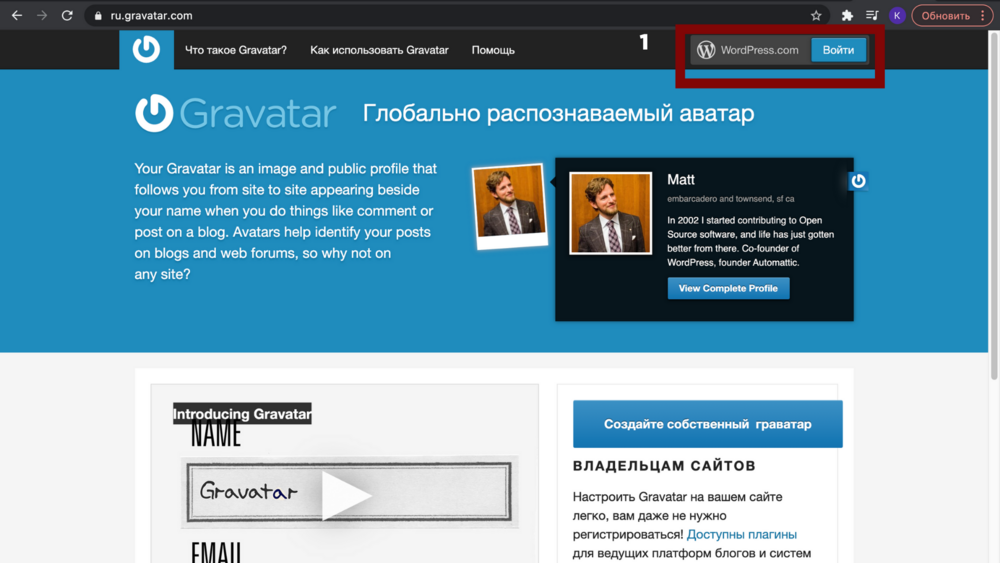
Step 1: Go to the website: https://ru.gravatar.com / and click “Enter”.
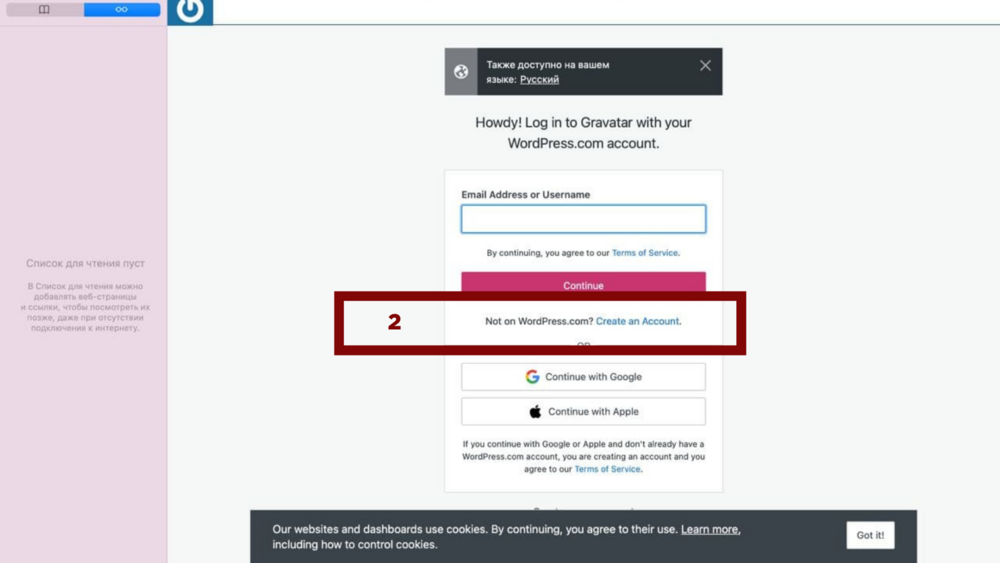
Step 2: You will be taken to the authorization page, which takes place through a WordPress account. If you don't have one, then create one as shown below.
Next, you will be taken to the account registration form, where you need to enter your email, or log in using Google (Continue with Google).
RECOMMENDATION: you need to register and access the site from the Google form. Prepare your mail in advance gmail.com , in case you don't have it.
After registering via Google Mail, you will be taken to a WordPress page where you will be asked to choose the name of your site. Log out of this page to the website https://ru.gravatar.com .
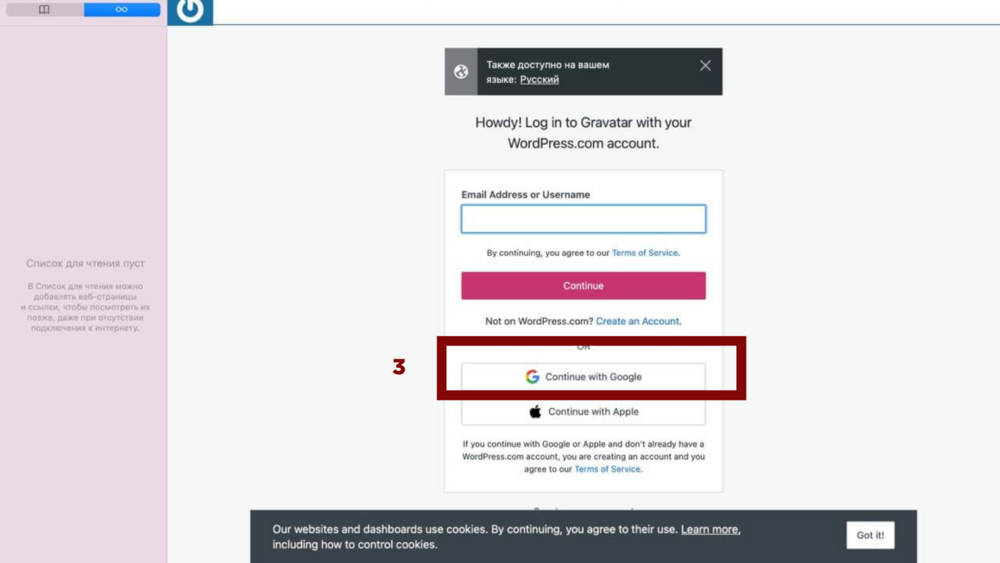
Step 3: Log in using the Google form.
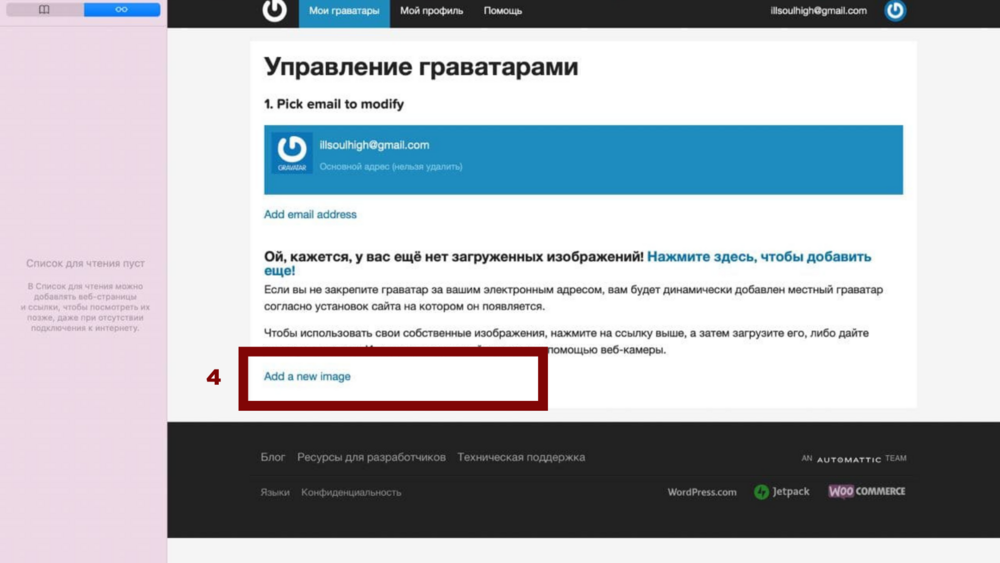
Step 4: Click the Add a new image button to select your avatar.
Step 5: Click the Upload new button to download the avatar from your device.
Step 6: Proceed to the file selection as shown in the screenshot.
Step 7: Select the file you want to upload and click the button as shown in the screenshot.
Step 8: Click “Next”.
Step 9: Click the buttonCrop Image, as shown in the screenshot.
Step 10: Select “Format G” and press the Set rating button.
Step 11: Under the number 1 you see your current avatar, and under the number 2 you can upload different images for your avatar.
Click on the labelView rating, which is highlighted in the screenshot.
Step 12: In the screenshot you can see the hash amount to be inserted into the DecimalChain console when creating or editing a token or valaditor.
Note
1.Gravatar is linked to a WordPress account and allows you to have only one avatar per WordPress account.
2.You can log in from one browser once. When you log out of your Gravatar account and log in again, you will be logged back into the same account. In this regard, if you want to upload multiple avatars, you will need multiple Google mail addresses.
3.Avatars can be changed on the same account, but time must pass for the correct display.
How to install an avatar for a coin
Log in to your console in the “Coin Issue” section and enter the “Coin Update” tab.
Next, click on the edit icon.
Insert the hash sum from step 12 of the Gravatar instructions into the “Icon” column and click the “Confirm” button.
How to install an image on a masternode
To set an avatar for the validator, go to the “Masternode” tab. Scroll down to the “Edit Masternode” form and paste the hash sum from step 12 of the Gravatar instructions into the “Icon” column.


[[Category::Instructions]]


