Instruction:How to operate with NFT on DecimalChain: Difference between revisions
| [checked revision] | [checked revision] |
No edit summary |
CryptoUser (talk | contribs) No edit summary |
||
| (4 intermediate revisions by 2 users not shown) | |||
| Line 1: | Line 1: | ||
{{#seo: | {{#seo: | ||
|title= How to operate with NFT on the Decimal blockchain — Instruction on Decimal Wiki | |||
|titlemode= append | |||
|keywords= How to create an NFT, check your NFT, edit NFT, send NFT, delegate NFT, burn NFT | |||
|description= Decimal instruction. How to operate with NFT on the Decimal blockchain | |||
}} | |||
{{manual-console}} | |||
{{main article|NFT}} | |||
In this article, we will discuss the main operations with [[NFT]]s that are available to you in our blockchain console. You will learn how to create an NFT, to check your NFT, to edit NFT reserve, to send NFT, to delegate your NFT, and to burn NFT. | |||
< | {{hint|You can find more detailed guides on the '''[[:Category:Instructions:NFT|our instructions page]]'''.}} | ||
{{TOC right}} | |||
== How to create an NFT on Decimal blockchain == | |||
{{main article|Instruction:How to create a public NFT}} | |||
To create [[NFT|non-interchangeable token]], log to your personal [[Decimal Console|console]] [[DecimalChain]] using your [[seed phrase]]. | |||
In the panel on the left, find the '''NFT''' button. | |||
[[File:en-create-nft1.jpeg|700px|thumb|left]]<br clear="all"> | |||
Next, in the upper corner on the right, click the '''NFT release'''. | |||
# Fill in the field with the name of your collection in Latin letters. | |||
# Fill in the field with the name of your NFT in any language. | |||
# Enter the reserve value of your NFT (at least 1 [[DEL]]). | |||
# Enter a description of your token in any language. | |||
# Enter the number of copies of your NFT. | |||
# Click the '''Continue'''. | |||
[[File:en-create-nft2.jpeg|700px|thumb|left]]<br clear="all"> | |||
Next, you will see the '''Token URI''' field, which cannot be edited through the console interface. This parameter will be needed by programmers who will be able to edit it via [[API]], if you need to organize your own NFT data warehouse. | |||
To the right you will see the field '''URI identifier''', which you can edit via the console interface at your discretion. This line can also be left not treason. | |||
Next, click '''Upload file''' and select the file to upload. | |||
[[File:en-create-nft3.jpeg|700px|thumb|left]]<br clear="all"> | |||
Use the slider to determine the display of the cover of your NFT and click the '''Save''' button. | |||
[[File:en-create-nft4.jpeg|700px|thumb|left]]<br clear="all"> | |||
After the cover of your NFT is saved, click the '''Continue''' button. | |||
[[File:en-create-nft5.jpeg|700px|thumb|left]]<br clear="all"> | |||
'''Now you need to select options for your NFT'''. | |||
* Check the box if you plan to add new [[token]]s to the collection later, and DON'T check the box if you DON'T plan to. | |||
* Check the box if you want to create a [[private NFT]], and DON'T check the box if you want your NFT to remain [[public NFT|public]]. | |||
'''Private NFT/SFT''' are only available to the current owner in the console. At the same time, no NFT/SFT content will be available for preview in the Browser. While '''public (regular) NFT/SFT''' in full quality and size is available for viewing/listening only to the current owner in the console, and the rest of the users in the Browser have access to the cover and demo segment — a piece of the original file cut in quality and duration. | |||
After you check the necessary boxes, click the '''Create NFT''' button. | |||
[[File:en-create-nft6.jpeg|700px|thumb|left]]<br clear="all"> | |||
Be sure to check all the data of your NFT and, if everything is correct, click the '''Confirm''' button. | |||
[[File:en-create-nft7.jpeg|700px|thumb|left]]<br clear="all"> | |||
Check the data again and confirm the [[transaction]]. | |||
[[File:en-create-nft8.jpeg|700px|thumb|left]]<br clear="all"> | |||
'''Congratulations! The transaction has been successfully sent to the blockchain and you can verify it by hash.''' | |||
[[File:en-create-nft9.jpeg|700px|thumb|left]]<br clear="all"> | |||
Click on [[hash]] transactions and you will be taken to [[Decimal Explorer]], where you will see all the information about your token and will be able to verify that the transaction status is '''Successful'''. | |||
By the way, according to this hash, any user will be able to get acquainted with all the information about your token. | |||
[[File:en-create-nft10.jpeg|700px|thumb|left]]<br clear="all"> | |||
Go back to the page where you received the hash of the transaction with the release of your NFT, and click the '''OK''' button. | |||
[[File:en-create-nft11.jpeg|700px|thumb|left]]<br clear="all"> | |||
== How to send NFT == | |||
{{main article|Instruction:How to send an NFT}} | |||
Go to the console and select '''NFT''' in the left menu. | |||
[[File:en-create-nft12.jpeg|700px|thumb|left]]<br clear="all"> | |||
Then scroll down the page and you will find a form for sending NFT, where you need to fill in all the fields. | |||
# Select the collection to send. | |||
# Select eroded, if more than one copy was released. | |||
# Enter the address of the recipient of your NFT. | |||
# Select the number of copies, if more than one was produced. | |||
# Optionally, use the advanced mode, where you can leave a message and select a coin to pay the fee. | |||
After the form is completed, click the '''Submit''' button. | |||
[[File:en-create-nft13.jpeg|700px|thumb|left]]<br clear="all"> | |||
Then check the data and confirm the transaction: | |||
[[File:en-create-nft15.jpeg|700px|thumb|left]]<br clear="all"> | |||
== How do I check my NFT on the console? == | |||
Go to the console and select '''NFT''' in the left menu. | |||
How | [[File:en-create-nft16.jpeg|700px|thumb|left]]<br clear="all"> | ||
Next, in the upper right corner, select the button '''My NFTs'''. | |||
[[File:en-create-nft17.jpeg|700px|thumb|left]]<br clear="all"> | |||
Select the NFT you need and click on its image to get to the page with all the information about your token and see all the transactions associated with it. | |||
[[File:en-create-nft18.jpeg|700px|thumb|left]]<br clear="all"> | |||
It is on this page that you can "edit the reserve" of your token, '''burn''' your token and '''open the file''' attached to this NFT. | |||
Hover the cursor over the three dots in the upper-left corner and select the action you want to do. | |||
[[File:en-create-nft19.jpeg|700px|thumb|left]]<br clear="all"> | |||
== How to edit the NFT reserve == | |||
To edit the reserve of your NFT, go to the page of the desired token, hover the cursor over the three dots in the upper right corner and select '''Edit reserve'''. | |||
[[File:en-create-nft20.jpeg|700px|thumb|left]]<br clear="all"> | |||
Next, enter a new reserve value and determine the number of tokens with the new reserve, if you have created more than one instance in the collection. Then click the '''Confirm''' button. | |||
{{!!!}} '''NOTE! The NFT reserve can only be INCREASED! It is impossible to reduce the reserve.''' | |||
[[File:en-create-nft21.jpeg|700px|thumb|left]]<br clear="all"> | |||
Check the data and confirm the transaction. | |||
[[File:en-create-nft22.jpeg|700px|thumb|left]]<br clear="all"> | |||
Now click on the hash of the transaction to see its display in the [[Decimal Explorer|blockchain browser]]. | |||
[[File:en-create-nft23.jpeg|700px|thumb|left]]<br clear="all"> | |||
'''Any change to your token will be displayed in the blockchain.''' | |||
== How to delegate NFT == | |||
{{main article|Instruction:How to delegate an NFT}} | |||
Go to your console and select the '''NFT''' button in the left menu. | |||
[[File:en-create-nft24.jpeg|700px|thumb|left]]<br clear="all"> | |||
How to | |||
In the upper right corner, select the "Delegate" button and fill in all the fields. | |||
To | # Select the NFT to send. | ||
# Select the copy if you have released more than one copy. | |||
# Enter the address of the validator to whom you want to delegate the NFT. | |||
# Select the number of tokens if you have issued more than one instance. | |||
# By clicking on the slider '''Advanced Mode''', you will be able to add a message and select a coin to pay the transaction fee. | |||
After you have entered all the information in the appropriate fields, click the '''Delegate''' button. | |||
[[File:en-create-nft25.jpeg|700px|thumb|left]]<br clear="all"> | |||
Then check the data and confirm the transaction. | |||
[[File:en-create-nft26.jpeg|700px|thumb|left]]<br clear="all"> | |||
== How to "burn" NFT == | |||
{{main article|Instruction:Burning NFT}} | |||
To [[burning|burn]] your NFT, go to the page of the desired [[token]], hover the cursor over the three dots in the upper right corner and select '''Burn'''. | |||
[[File: | [[File:en-create-nft27.jpeg|700px|thumb|left]]<br clear="all"> | ||
[[File: | Select the token and it is eroded, if more than one instance was created, and click the '''Confirm''' button. | ||
[[ | |||
[[File: | [[File:en-create-nft28.jpeg|700px|thumb|left]]<br clear="all"> | ||
Check the data and confirm the [[transaction]]. | |||
[[File: | [[File:en-create-nft29.jpeg|700px|thumb|left]]<br clear="all"> | ||
Next, go through the hash of the transaction and make sure the status is '''Successful''', and also look at all the information that is displayed in the blockchain browser. | |||
[[File:en-create-nft30.jpeg|700px|thumb|left]]<br clear="all"> | |||
[[File: | |||
'''After the liquidation of the NFT, the reserve embedded in its collateral will be added to your balance.''' | |||
[[File: | |||
[[Category:Instructions:NFT]] | |||
[[File: | |||
[[File: | |||
[[ | |||
[[File: | |||
[[File: | |||
[[Category:Instructions]] | |||
Latest revision as of 19:16, 30 April 2024
| This is a page with the instruction guide to the Decimal Console. |
Main article: NFT
In this article, we will discuss the main operations with NFTs that are available to you in our blockchain console. You will learn how to create an NFT, to check your NFT, to edit NFT reserve, to send NFT, to delegate your NFT, and to burn NFT.
How to create an NFT on Decimal blockchain
Main article: Instruction:How to create a public NFT
To create non-interchangeable token, log to your personal console DecimalChain using your seed phrase.
In the panel on the left, find the NFT button.
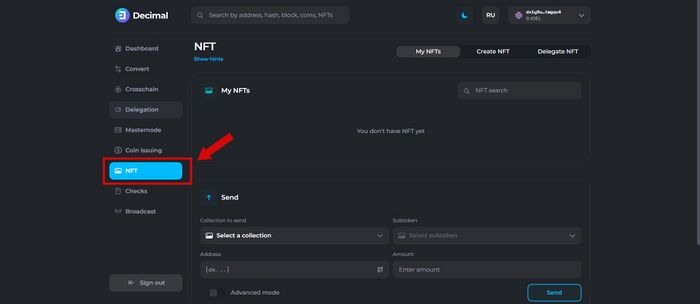
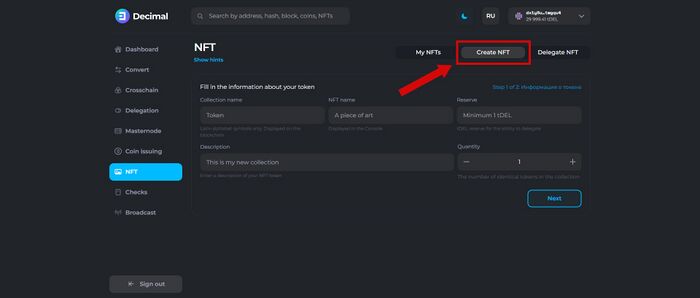
Next, in the upper corner on the right, click the NFT release.
- Fill in the field with the name of your collection in Latin letters.
- Fill in the field with the name of your NFT in any language.
- Enter the reserve value of your NFT (at least 1 DEL).
- Enter a description of your token in any language.
- Enter the number of copies of your NFT.
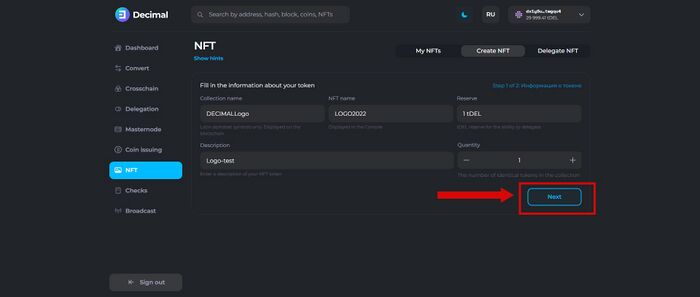
- Click the Continue.
Next, you will see the Token URI field, which cannot be edited through the console interface. This parameter will be needed by programmers who will be able to edit it via API, if you need to organize your own NFT data warehouse.
To the right you will see the field URI identifier, which you can edit via the console interface at your discretion. This line can also be left not treason.
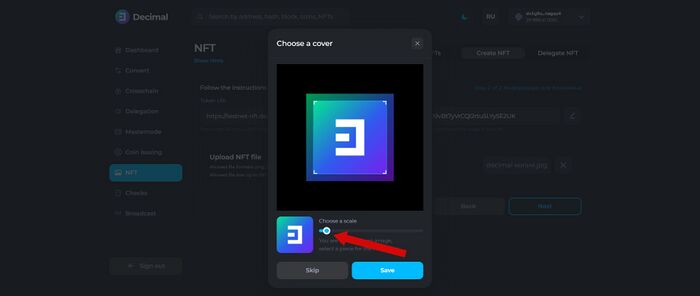
Next, click Upload file and select the file to upload.
Use the slider to determine the display of the cover of your NFT and click the Save button.
After the cover of your NFT is saved, click the Continue button.
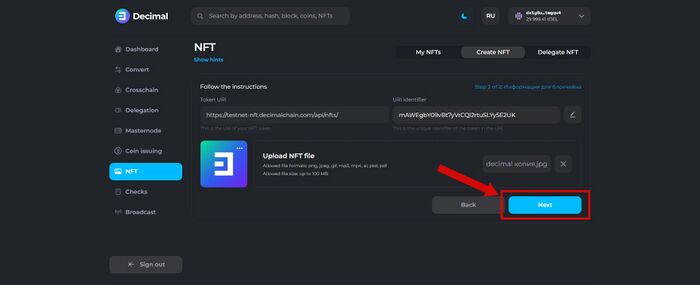
Now you need to select options for your NFT.
- Check the box if you plan to add new tokens to the collection later, and DON'T check the box if you DON'T plan to.
- Check the box if you want to create a private NFT, and DON'T check the box if you want your NFT to remain public.
Private NFT/SFT are only available to the current owner in the console. At the same time, no NFT/SFT content will be available for preview in the Browser. While public (regular) NFT/SFT in full quality and size is available for viewing/listening only to the current owner in the console, and the rest of the users in the Browser have access to the cover and demo segment — a piece of the original file cut in quality and duration.
After you check the necessary boxes, click the Create NFT button.
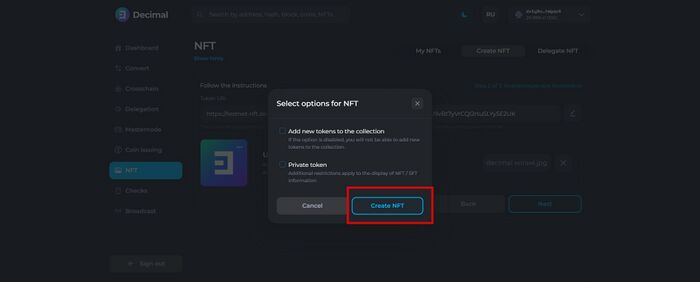
Be sure to check all the data of your NFT and, if everything is correct, click the Confirm button.
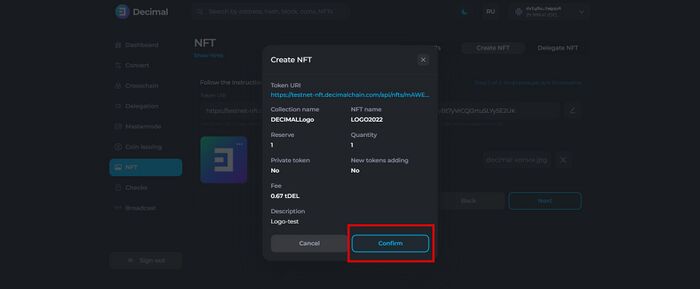
Check the data again and confirm the transaction.
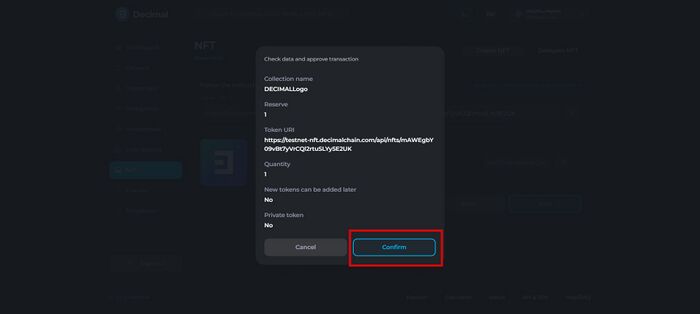
Congratulations! The transaction has been successfully sent to the blockchain and you can verify it by hash.
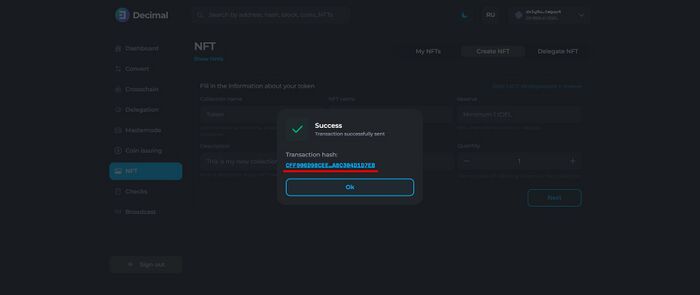
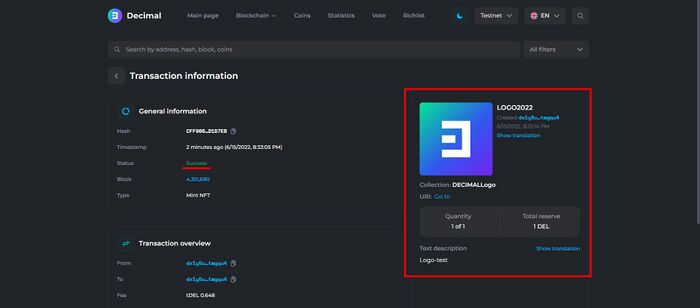
Click on hash transactions and you will be taken to Decimal Explorer, where you will see all the information about your token and will be able to verify that the transaction status is Successful.
By the way, according to this hash, any user will be able to get acquainted with all the information about your token.
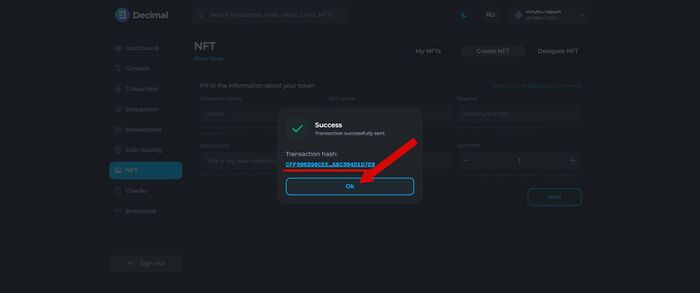
Go back to the page where you received the hash of the transaction with the release of your NFT, and click the OK button.
How to send NFT
Main article: Instruction:How to send an NFT
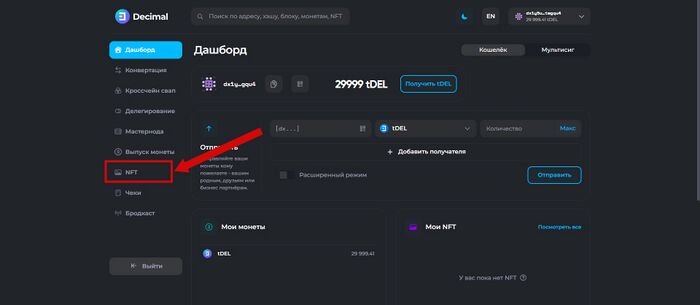
Go to the console and select NFT in the left menu.
Then scroll down the page and you will find a form for sending NFT, where you need to fill in all the fields.
- Select the collection to send.
- Select eroded, if more than one copy was released.
- Enter the address of the recipient of your NFT.
- Select the number of copies, if more than one was produced.
- Optionally, use the advanced mode, where you can leave a message and select a coin to pay the fee.
After the form is completed, click the Submit button.

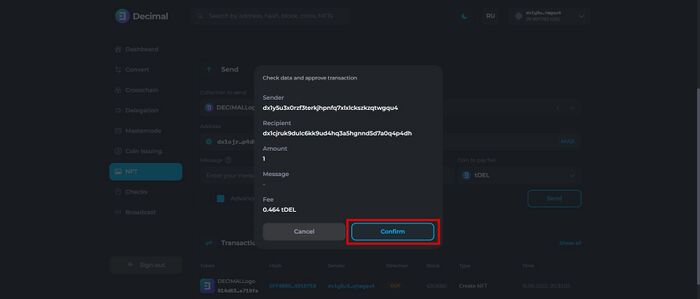
Then check the data and confirm the transaction:
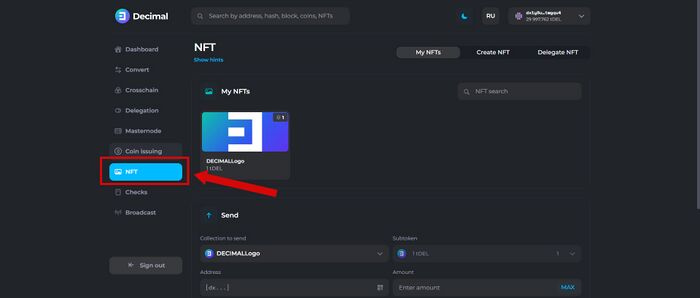
How do I check my NFT on the console?
Go to the console and select NFT in the left menu.
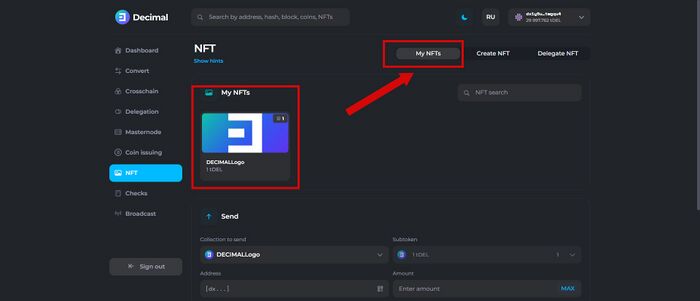
Next, in the upper right corner, select the button My NFTs.
Select the NFT you need and click on its image to get to the page with all the information about your token and see all the transactions associated with it.
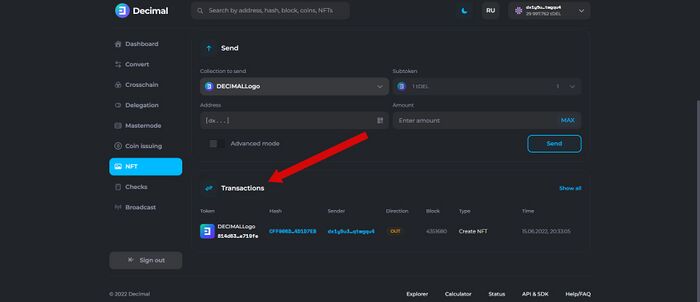
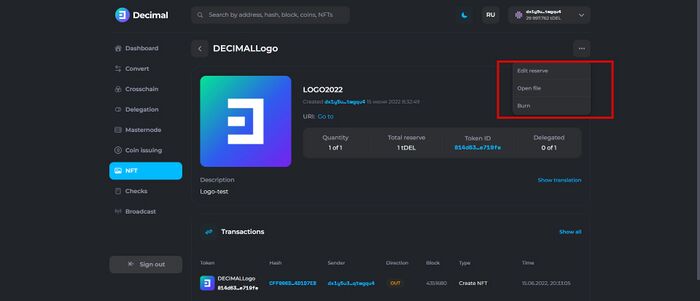
It is on this page that you can "edit the reserve" of your token, burn your token and open the file attached to this NFT.
Hover the cursor over the three dots in the upper-left corner and select the action you want to do.
How to edit the NFT reserve
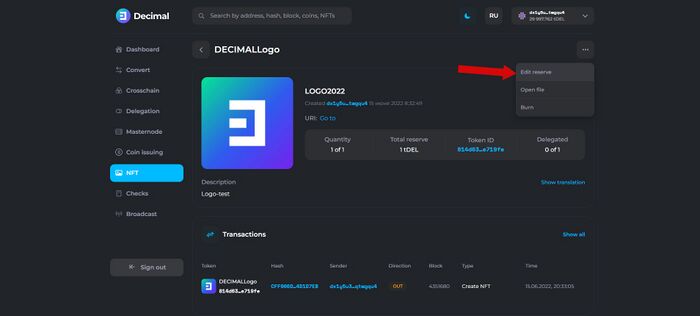
To edit the reserve of your NFT, go to the page of the desired token, hover the cursor over the three dots in the upper right corner and select Edit reserve.
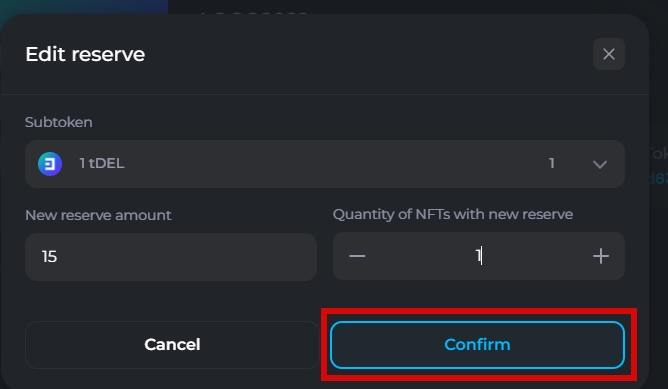
Next, enter a new reserve value and determine the number of tokens with the new reserve, if you have created more than one instance in the collection. Then click the Confirm button.
![]() NOTE! The NFT reserve can only be INCREASED! It is impossible to reduce the reserve.
NOTE! The NFT reserve can only be INCREASED! It is impossible to reduce the reserve.
Check the data and confirm the transaction.

Now click on the hash of the transaction to see its display in the blockchain browser.

Any change to your token will be displayed in the blockchain.
How to delegate NFT
Main article: Instruction:How to delegate an NFT
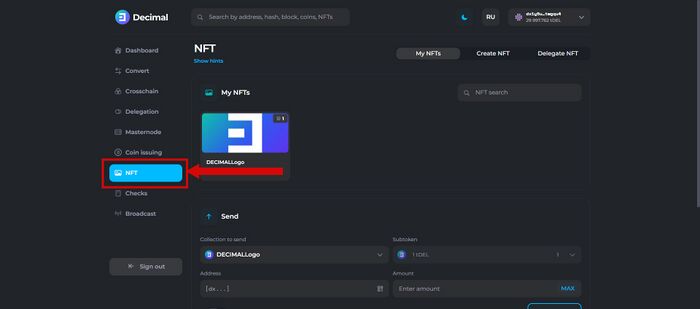
Go to your console and select the NFT button in the left menu.
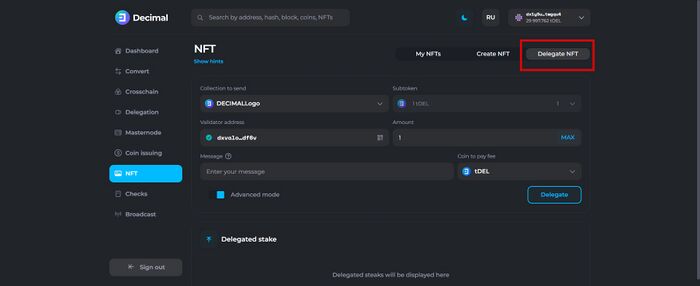
In the upper right corner, select the "Delegate" button and fill in all the fields.
- Select the NFT to send.
- Select the copy if you have released more than one copy.
- Enter the address of the validator to whom you want to delegate the NFT.
- Select the number of tokens if you have issued more than one instance.
- By clicking on the slider Advanced Mode, you will be able to add a message and select a coin to pay the transaction fee.
After you have entered all the information in the appropriate fields, click the Delegate button.
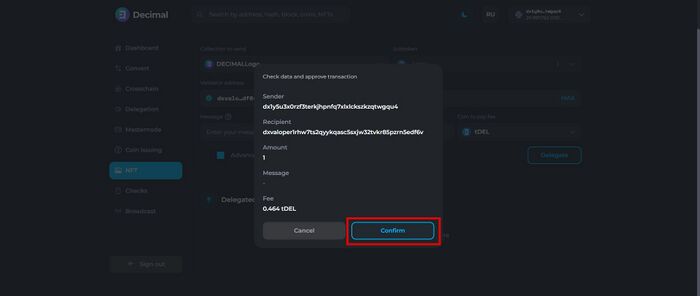
Then check the data and confirm the transaction.
How to "burn" NFT
Main article: Instruction:Burning NFT
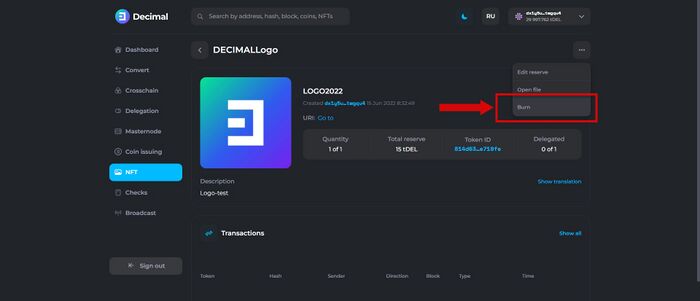
To burn your NFT, go to the page of the desired token, hover the cursor over the three dots in the upper right corner and select Burn.
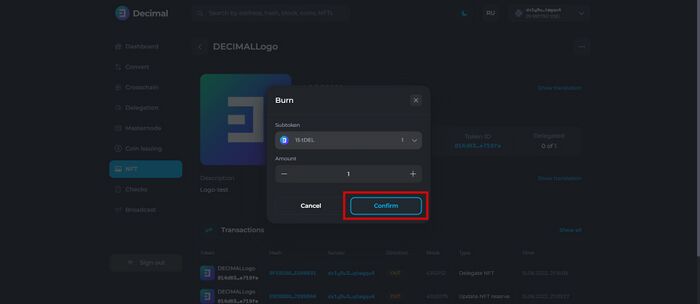
Select the token and it is eroded, if more than one instance was created, and click the Confirm button.
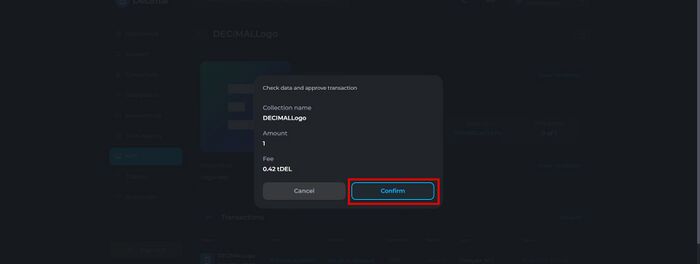
Check the data and confirm the transaction.
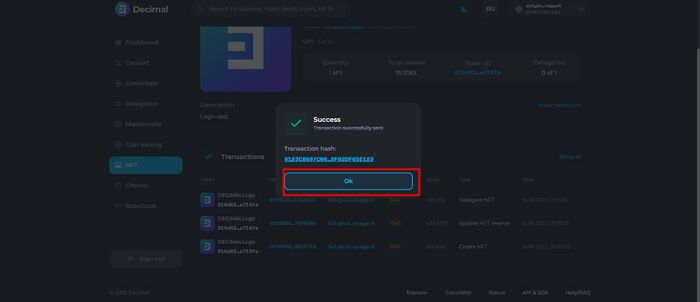
Next, go through the hash of the transaction and make sure the status is Successful, and also look at all the information that is displayed in the blockchain browser.
After the liquidation of the NFT, the reserve embedded in its collateral will be added to your balance.